 Make a Suggestion
 Ask a Question
 Print
Print Marking Assessments
Marking an Assessment, in the sense used in the Assessment Tool, involves entering the Learner's responses into the Assessment Tool so that it can calculate the Learner's Scale Score. To do this, an Educator or Administrator must:
- Download the Marking Guide for the Assessment; then
- Enter in all of the responses for each of the Learners assigned to that Assessment.
Downloading the Marking Guide
Note: To print or view the Marking Guide, you will need to have the Adobe Acrobat Reader installed on your computer, or be using a browser with the Acrobat plugin installed. The Acrobat Reader is available as a free download from the Adobe website.
- From either your Home or Assessments tab, select the name of the Assessment to view the Assessment details.
- From the side menu, select Download Marking Guide as PDF from the Print Assessment panel in the side menu.
- Download the Marking Guide and, if required, print it to a suitable printer attached to your computer.
Note: If there is no Print Assessment panel in the side menu, check that the Assessment is a Non-Adaptive for Printing Assessment by checking the value for Type in the Assessment details in the side menu. Only Non-Adaptive for Printing Assessments will have a Marking Guide, and an Assessment cannot be changed from one type to the other (i.e. you cannot create an Assessment as an Adaptive Assessment, then later change it to a Non-Adaptive for Printing Assessment or vice versa.)
Entering the Learners' responses into the Assessment Tool
Entering the Learner's responses into the Assessment Tool requires an understanding of the various different types of Assessment questions that can be asked. For the purposes of marking, these can be divided into:
- Multiple choice questions; and
- All other types of questions (e.g. constructed response, underlining, arranging in order and so on.)
To enter the Learners' responses into the Assessment Tool you will need to have downloaded the Marking Guide (see above), and you will need the completed copies of the Assessments as returned from the Learners.
Next:
- Navigate to the Marking page for the Assessment, either by selecting the Mark Assessment link next to the Assessment on your Home tab, or by viewing the Assessment details, and selecting Mark Assessment from the Mark Assessment panel in the side menu.
- Select the first Learner whose Assessment you wish to enter by selecting the Enter data button next to their name.
- Make sure that the Learner's name in the Assessment Tool is the same as the name on the front cover of the Assessment.
- Enter the date that the Learner sat the Assessment. You can do this manually, or by using the date picker to the right of the Date Assessment Taken: box.
- Using the dropdown, specify whether the Learner's first language is English if this not already shown (i.e. if the dropdown box shows Not Specified).
Now:
- If a Learner was assigned, but did not complete, the Assessment. Check the Did not sit Assessment box at the top of the page. This will clear any data that has been entered against the Learner's Assessment, and allow you to continue to mark other Learners' work. It does not remain checked after you select Save and Mark Next, so you can input marks for Learners who hand in their papers late. Once you have checked this box, select Save and Mark Next, as there are, presumably, no marks to enter for this particular Learner.
- For each multiple choice question, select the answer that the Learner gave (A, B, C, D etc.). The Assessment Tool will determine if this is correct or incorrect.
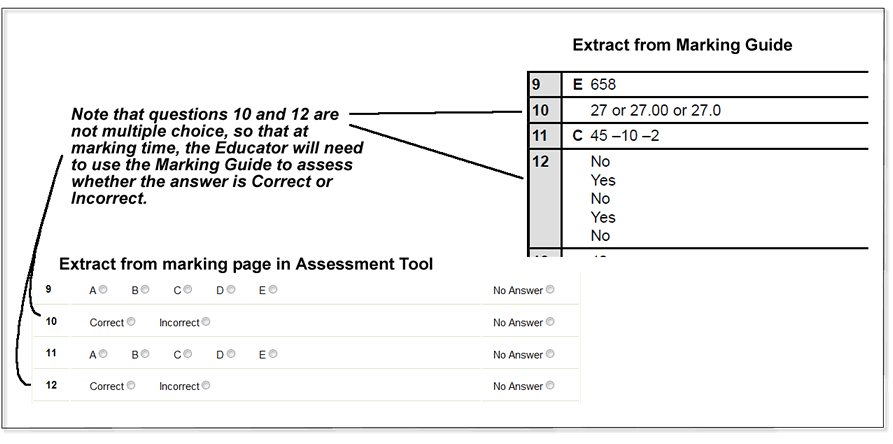
- For all other types of questions, use the Marking Guide to determine whether the Learner's response was Correct or Incorrect, then select the appropriate radio button (Correct or Incorrect) next to the question (see Figure 1, below).
When you have finished, select Save to save the marks and return to the Main Mark Assessment screen, or Save and Mark Next to be taken to the input screen for the next Learner in alphabetical order of last name. Check the new Learner's name in the Assessment Tool is the same as the name on the front cover of the Assessment.
When the Learners' responses have been entered, the Learner and Educator can view the Reports for the Assessment.
Warning: Always check that the Learner's name is the one that appears on the Assessment cover. There is no easy way to transfer marks from one Learner to another, and mistakes in marking are, therefore, time consuming to rectify.
Hint: It may be easier if you arrange the Learner's returned Assessments in the same order as they are presented in the marking page - i.e. alphabetically by last name.

Figure 1: The relationship between the Marking Guide and the marking screen where results are entered. Note that multiple choice Items do not require that the Item is marked Correct or Incorrect.
 Make a Suggestion
 Ask a Question
 Print
Print | Last reviewed:
27/01/2010 1:43:03 p.m. © Tertiary Education Commission. All rights reserved. |


